

Tender
SP&S #273
Astoria RR
Work Photos
Early Photos
History
Events
Join
ARPA
Links
Contact Us
Home
|
|
| R E S T O R A T I O N A N N O T A T I O N S |
|
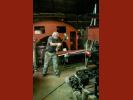
Downpipes Installed
Saturday, August 31, 2024
Since we have both of the downpipes completed, we decided to get them out of the way and in where they belong. We spent most of the day Saturday more... |
|
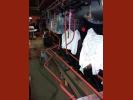
FRA Inspector Visits
Friday, August 30, 2024
more... |
|
Annealing the Flues
Wednesday, August 28, 2024
Swedging the flue tubes to reduce the end diameter at the fire box tube sheet work hardened the steel. In order to make sure that the ends of the more... |

|
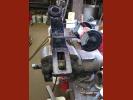
New Piston Rings
Wednesday, August 21, 2024
We nave the pistons ready to go, and so ordered new rings to fit. Only 19 inches in more... |
|
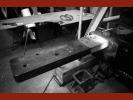
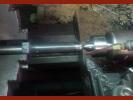
Painting the Downpipes
Wednesday, August 21, 2024
The fabrication of the downpipes has finally been completed. After we built the flanges, Stu cut and fit the individual pipe pieces. He tacked more... |
|
Installing Brake Gear
Wednesday, July 10, 2024
Having finally completed the two new brake beams this spring we decided to get them out of our way and under the locomotive where they belong. Jim, more... |
|
Fabricating Downpipes
Saturday, April 13, 2024
There are two 6-inch diameter pipes that connect the superheater manifold in the top of the smoke box to the valve steam chest at each more... |

|
Fabricating Downpipes
Saturday, February 24, 2024
There are two 6-inch diameter pipes that connect the superheater manifold in the top of the smoke box to the valve steam chest at each more... |
|
Fabricating Downpipes
Saturday, February 24, 2024
There are two 6-inch diameter pipes that connect the superheater manifold in the top of the smoke box to the valve steam chest at each more... |
|
Building Brake Beams
Wednesday, December 13, 2023
Two of the existing brake beams were stolen from the shop site and so we had to make new ones. We had the center sections forged, and then welded more... |
|
New Shiny Bits on Display
Sunday, September 17, 2023
We had all the timing gear and the main rods in place when we rolled #21 out for the 2023 Open House. Robert is still working on new more... |
|
New Rod Bearings Cast
Wednesday, September 6, 2023
We also had new bearings cast for the forward (small) end of the main rods. Here Robert is machining the new more... |
|
Grease Reservoir in Eccentric Rods
Saturday, August 19, 2023
The large end of the eccentric rods will have a grease fitting to lubricate the bushing that rides on the eccentric crank. Robert is drilling out more... |
|
Grease Reservoir in Eccentric Rods
Saturday, August 19, 2023
The eccentric rods on #21 were missing and we have machined new ones. The large end which rides on the eccentric crank has a large grease fitting to more... |
|
Re-installing the Wrapper Bands
Saturday, July 22, 2023
Rodney fabricated the Wrapper Bands to fit around the boiler. They will support the final wrapper that covers the boiler insulation. The bands were more... |
|
The Superheater Manifold
Wednesday, July 19, 2023
The Superheater Manifold was pulled from storage at K Manufacturing and we blew out the dust and debris prior to sending it up to Portland to be more... |
|
Painting the Wrapper Bands
Wednesday, July 19, 2023
Rodney fabricated a series of bands to support the final boiler wrapper. We then sand blasted them and coated them with a zinc primer. Finally a more... |
|
The nut is off!
Saturday, June 3, 2023
We are machining new piston rods so the pistons have to be removed from the old rods. Due to the size of the nuts and the fact that they have been more... |
|
The wrench
Saturday, June 3, 2023
We are machining new piston rods so the pistons have to be removed from the old rods. Due to the size of the nuts and the fact that they have been more... |
|
A lot of heat!
Saturday, June 3, 2023
We are machining new piston rods so the pistons have to be removed from the old rods. Due to the size of the nuts and the fact that they have been more... |
|
Removing the piston nuts
Saturday, June 3, 2023
We are machining new piston rods so the pistons have to be removed from the old rods. Due to the size of the nuts and the fact that they have been more... |
|
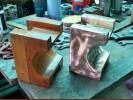
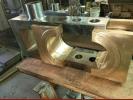
New Bronze Facing on Crosshead
Monday, May 15, 2023
New bronze facing plates were machined and riveted to the inside faces of the crossheads. These plates ride on the sides of the lower crosshead more... |
|
New Rod Bearings Cast
Wednesday, August 3, 2022
We were able to rework the one main rod bearing that we had but had to cast a new one to replace the missing one. A pattern was made and new bearing more... |
|
Main Rod Bearings
Saturday, July 30, 2022
In preparation for the installation of the main drive rods Robert has been cleaning up the one existing bearing. In addition we had a new bearing more... |
|
The connecting rods are back on
Wednesday, April 20, 2022
more... |
|
Truing up the connecting rods.
Wednesday, April 6, 2022
All of the bearings in the connecting rods had to machined to fit the new pins that we had installed in the wheels and the center to center distance more... |
|
Rolled out for 2021 Open House
Sunday, September 19, 2021
more... |
|
Rolled out for 2021 Open House
Sunday, September 19, 2021
more... |
|
Rolled out for 2021 Open House
Sunday, September 19, 2021
more... |
|
The Cab Goes Back On
Saturday, July 31, 2021
Now that the running gear is together and we are able to move #21 on her "temporary" rails were able to clear enough room to be able to move the cab more... |
|
The Cab Goes Back On
Saturday, July 31, 2021
Now that the running gear is together and we are able to move #21 on her "temporary" rails were able to clear enough room to be able to move the cab more... |
|
#21 Emerges
Saturday, May 22, 2021
A bit of a red letter day for the restoration on Saturday: Our #21 is completely supported on her own running gear and we decided to roll her out to more... |
|
Front Equalizing Beam
Wednesday, March 24, 2021
Before hanging the trunion under the saddle of the locomotive we test fit the new parts together. more... |
|
Front Equalizing Beam
Wednesday, March 24, 2021
The front equalizing beam transfers weight between the #1 driver and the lead truck. Here we are checking to ensure fit in the new trunion that it more... |
|
Priming various air lines
Saturday, December 19, 2020
One of the ongoing tasks as we put the locomotive together is to pull out the many parts that have been stashed around the shop and getting them more... |
|
Hanger modification
Wednesday, November 11, 2020
A key component in the suspension system of the locomotive is this hanger for the aft end of the equalizing beam between the lead truck and the #1 more... |
|
Frame Member Straighting
Saturday, September 26, 2020
The rear frame member that supports the back edge of the cab was bent up and needed to be straightened. The easy way is to heat it red hot then to more... |
|
Frame Member Straighting
Saturday, September 26, 2020
The rear frame member that supports the back edge of the cab was bent up and needed to be straightened. The easy way is to heat it red hot then to more... |

|
Frame Member Straighting
Saturday, September 26, 2020
The rear frame member that supports the back edge of the cab was bent up and needed to be straightened. The easy way is to heat it red hot then to more... |

|
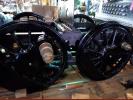
Adjusting the wheel spacing
Wednesday, August 19, 2020
We have spent the past couple of weeks adjusting the wheel spacing to exactly 56 inches center to center on each pair of drive wheels. This involves more... |
|
Adjusting the wheel spacing
Wednesday, August 19, 2020
We have spent the past couple of weeks adjusting the wheel spacing to exactly 56 inches center to center on each pair of drive wheels. This involves more... |
|
Hanging the Tumble Shaft
Wednesday, July 15, 2020
The tumble shaft connects the valve mechanisms on each side of the locomotive and ensures that they work together. We have trued up the surface more... |
|
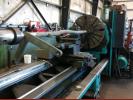
Machining the Tumble Shaft
Wednesday, July 1, 2020
After welding up the worn bearing surfaces on the tumble shaft John took it out to Art Dick's shop in Knappa and machined it to fit the more... |

|
Welding up the Tumble Shaft
Saturday, June 27, 2020
The tumble Shaft was badly worn and out of round where it rides in its support pedestals. John has welded up the worn surface and will turn it to more... |
|
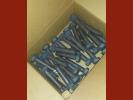
Lots of Tapered Bolts
Sunday, June 14, 2020
Most of the bolts holding pieces of the locomotive together have tapered shafts. This requires us to ream the holes with tapered reamers and to more... |
|
Turning a tapered bolt
Thursday, May 14, 2020
Most of the bolts holding pieces of the locomotive together have tapered shafts. This requires us to ream the holes with tapered reamers and to more... |
|
Bolt Blanks
Thursday, April 16, 2020
Most of the bolts holding pieces of the locomotive together have tapered shafts. This requires us to ream the holes with tapered reamers and to more... |

|
Bushings, bushings, bushings!
Saturday, July 13, 2019
All of the equalizing beams require bushings where the pivot. Dave Hill and John have been busy machining new bushings that we then took up to more... |
|
Bushings, bushings, bushings!
Saturday, July 13, 2019
All of the equalizing beams require bushings where they pivot. Dave Hill and John have been busy machining new bushings that we then took up to more... |
|
Bushings, bushings, bushings!
Saturday, July 13, 2019
All of the equalizing beams require bushings where they pivot. Dave Hill and John have been busy machining new bushings that we then took up to more... |
|
Running boards, steps and cab floor
Saturday, July 6, 2019
We,ve been spending the summer disassembling, sandblasting, painting and fitting various bits and pieces that allow the crew to access and maintain more... |
|
Running boards, steps and cab floor
Saturday, July 6, 2019
We,ve been spending the summer disassembling, sandblasting, painting and fitting various bits and pieces that allow the crew to access and maintain more... |
|
Running boards, steps and cab floor
Saturday, July 6, 2019
We've been spending the summer disassembling, sandblasting, painting and fitting various bits and pieces that allow the crew to access and more... |
|
Smokebox braces repaired
Wednesday, December 19, 2018
Here is one of the smoke box braces with the strong backs welded in place. The v-shaped notches will be filled with layers of weld and then the more... |
|
Smokebox braces repaired
Wednesday, December 19, 2018
Once the cut ends were beveled the pieces were clamped back in position so that strongback plates could be welded on. This will hold them straight more... |
|
Smokebox braces repaired
Wednesday, December 19, 2018
When SMV 21 was taken apart in California prior to it being trucked to Washington several key parts were cut with a torch as there was not enough more... |
|
Preparing for Smokebox Rivets
Saturday, December 8, 2018
The new smokebox was temporarily installed with bolts in case the alignment needed to be tweaked when the boiler would be installed on the frame. more... |
|
Fitting Waist Sheets
Wednesday, November 28, 2018
Five sets of waist sheets and the saddle hold the boiler above the frame. We only had one and one half of the five original sheets. We placed the more... |
|
Saddle bolts
Monday, October 8, 2018
Holes for the saddle bolts must be bored in the new smokebox. They were first transfer punched through the saddle from the outside and then a pilot more... |
|
Fitting Waist Sheets
Saturday, September 29, 2018
Once the boiler was in place over the frame the waist sheets were to be fitted. We only have two of the original sheets. These were fitted in to more... |
|
Open House
Sunday, September 23, 2018
The open house was well attended. And the comment most heard was that it really looks like a locomotive more... |
|
Open House
Sunday, September 23, 2018
Just in time, the frame was under the boiler for the Open more... |
|
Checking for proper alignment
Saturday, September 22, 2018
Before the boiler could be lowered onto the frame we had to check it for proper more... |
|
The frame goes under the boiler
Wednesday, September 19, 2018
The frame is in place but the boiler must be lowered down and the cribbing and the cross beam support must be removed prior to the open more... |
|
The frame goes under the boiler
Wednesday, September 19, 2018
Without too much ado, the frame rolled almost effortlessly under the more... |
|
The frame goes under the boiler
Wednesday, September 19, 2018
more... |
|
The frame goes under the boiler
Wednesday, September 19, 2018
more... |
|
The frame goes under the boiler
Wednesday, September 19, 2018
The Cat and winch are ready at the other end of the shop. Cable goes through a hole cut into the wall and is attached to the harness on the more... |
|
The frame goes under the boiler
Wednesday, September 19, 2018
The boiler is up in the air; The track rails are bolted down; the pulling harness is attached and we are all ready to more... |
|
The frame goes under the boiler
Tuesday, September 18, 2018
The rush was on to get the assembled frame and wheels under the boiler prior to our annual open house. This required the installation of temporary more... |
|
The crew after the frame is on the wheels
Sunday, August 19, 2018
After successfully getting the frame down over the axles the crew posed for a group more... |
|
The final lift
Sunday, August 19, 2018
After the shims had been clamped on the pedestals and the binders removed, the frame was picked up and lowered over the drive boxes. We set it on more... |
|
Almost there
Sunday, August 19, 2018
It was a tight squeeze around the corner of the Quonset. We had to reposition the crane once and the Hyster several times in order to get the frame more... |
|
Moving the Frame
Sunday, August 19, 2018
Early Sunday morning we rigged slings on the frame, positioned the crane and hyster, and began moving the frame to the waiting more... |
|
Ready for the frame?
Saturday, August 18, 2018
In preparation for putting the drivers in the frame, we placed the wheels on the track, spaced out properly for assembly and placed the drive boxes more... |
|
Section track
Sunday, July 22, 2018
Assembled section of track was moved to the shop and placed in front of the big more... |
|
Section track
Sunday, July 22, 2018
Assembled section of track was moved to the shop and placed in front of the big more... |
|
Section track
Sunday, July 22, 2018
Assembled section of track was moved to the shop and placed in front of the big more... |
|
Section track
Sunday, July 22, 2018
Assembled section of track was moved to the shop to be placed in front of the big more... |
|
Section track
Sunday, July 22, 2018
In order to assemble the frame on the wheels so it can be rolled under the boiler it was necessary to place track in front of the shop. We had more... |
|
Trailing Truck Assembled
Saturday, July 14, 2018
In preparation for putting a section of track in front of the shop door, the trailing truck had to be assembled and the sandblast pot moved. The more... |
|
Scraping a bearing
Saturday, July 7, 2018
In preparation for assembly of the frame and wheels in front of the shop door we moved the drivers alongside the shop, checked the fit of the drive more... |
|
Drive wheels moved alongside the shop
Saturday, June 30, 2018
In preparation for assembly of the frame and wheels in front of the shop door we moved the drivers alongside the shop, checked the fit of the drive more... |
|
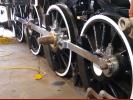
Final Paint on the Drivers
Sunday, June 24, 2018
After a stretch of crummy weather and the sanding of runs left behind by the novice painter, the drivers got the second coat of primer and the final more... |
|
Painting the Drivers
Saturday, April 21, 2018
To ready the wheels for assembly we applied two coats of primer followed by a final coat of gloss black enamel. more... |
|
Getting Drivers ready for paint
Saturday, April 21, 2018
After the drive pins were put in we moved the drivers back to the shop and peened over the flanges on the inside of the wheels. We also cleaned up more... |
|
Drive Pin Installation Day 2
Wednesday, December 6, 2017
On Saturday we finished installing 6 of the 8 pins before we ran out of LN2. We had turned over axles 1 & 2 & 4 on Saturday in order to put the more... |
|
Drive Pin Installation
Saturday, December 2, 2017
On Saturday we met at K Manufacturing to install the new drive pins into the driver wheelsets. John had ordered a Dewar of liquid nitrogen (LN2) to more... |
|
Drive Pin Installation
Saturday, December 2, 2017
more... |
|
Drive Pin Installation
Saturday, December 2, 2017
more... |
|
Drive Pin Installation
Saturday, December 2, 2017
more... |
|
Drive Pin Installation
Saturday, December 2, 2017
more... |
|
Drive Pin Installation
Saturday, December 2, 2017
more... |
|
Getting Ready for Final Assembly
Saturday, July 1, 2017
more... |
|
Making Spring Hangers
Saturday, April 8, 2017
more... |
|
The Castings
Wednesday, September 7, 2016
When we picked up the castings from the foundry we were pleasantly more... |
|
The Castings
Wednesday, September 7, 2016
The castings included the valve thimble and the two end more... |
|
Casting the Valve Spindle
Tuesday, August 30, 2016
Because the thimble is hollow a separate female pattern was made to form a core piece that creates the hollow through the middle of the more... |
|
Casting the Valve Spindle
Tuesday, August 30, 2016
After several months preparing patterns for the spindle, it's core and the two end pieces they were finally delivered to a foundry in Portland. more... |
|
Pattern Making
Saturday, February 6, 2016
And another picture of the pattern being turned on the more... |
|
Pattern Making
Saturday, February 6, 2016
The laminated pine blocks were then chucked in a lathe to be turned down to make the pattern for the valve more... |
|
Pattern Making
Saturday, January 30, 2016
We only have one of the valve spindles and so must have a second one cast. This requires the creation of patterns made of wood so the part can be more... |
|
We Are Still Peening
Saturday, June 13, 2015
We are getting closer to having all the staybolts peened. It has been a slow and noisy more... |
|
Welding a modification to a little tool
Saturday, June 13, 2015
Still peening the stay bolts... we needed a tool to hold the flexible ball-nuts from turning when we peen over the bolt. Mark made a tool to fit but more... |
|
Welding - without the arc flash
Saturday, June 13, 2015
Still peening the stay bolts... we needed a tool to hold the flexible ball-nuts from turning when we peen over the bolt. Mark made a tool to fit but more... |
|
Peening the Crown Stays
Saturday, October 11, 2014
After the crown stays are in place, they must be cut off leaving 1/4 inch of material that is then peened over to form a head similar to a rivet more... |
|
The Crown Stays are Finally In
Friday, October 10, 2014
Installation of the crown stays took a lot longer than we thought. In fact we broke from the tedium during the summer to assemble the lead truck more... |
|
Installing Crown Stays
Saturday, March 15, 2014
The final step in the process is to thread the bolt into the hole. Dave here is using a cheater bar on the socket wrench to turn the staybolt into more... |
|
Installing Crown Stays
Saturday, March 15, 2014
We used the Mag Drill setup on a sloped platform to power the reamer cutting each of the tapered holes. We then inserted the tapered tap and turned more... |
|
Installing Crown Stays
Saturday, March 15, 2014
After the hole in the crown of the firebox has been reamed with the tapered reamer it is threaded with a tapered tap. In this picture the tap has more... |
|
Installing Crown Stays
Saturday, March 15, 2014
All winter and into the spring we have been installing crown stays in the boiler. As noted previously, the crown stays have tapered threads on the more... |
|
Tapered threads on central crown stays
Saturday, October 26, 2013
The central rows of crown stays have tapered threads on the firebox end and straight threads in the boiler. We are tapping the tapered threads from more... |
|
Tapered threads on central crown stays
Saturday, October 26, 2013
The central rows of crown stays have tapered threads on the firebox end and straight threads in the boiler. We are tapping the tapered threads from more... |
|
Truing up the drive box cellars
Saturday, August 3, 2013
All of the pins that hold the cellars in the Drive Boxes are pretty badly worn. Thus we are making new pins that are slightly oversize and truing up more... |
|
Truing up the drive box cellars
Saturday, August 3, 2013
All of the pins that hold the cellars in the Drive Boxes are pretty badly worn. Thus we are making new pins that are slightly oversize and truing up more... |
|
Forging of crown staybolts
Friday, June 28, 2013
We have been manufacturing new staybolts for the crown of the firebox in the boiler. The first step was preparation of the dies to be used in the more... |
|
Forging of crown staybolts
Friday, June 28, 2013
We have been manufacturing new staybolts for the crown of the firebox in the boiler. The first step was preparation of the dies to be used in the more... |
|
Forging of crown staybolts
Friday, June 28, 2013
We have been manufacturing new staybolts for the crown of the firebox in the boiler. The first step was preparation of the dies to be used in the more... |
|
Forging of crown staybolts
Friday, June 28, 2013
We have been manufacturing new staybolts for the crown of the firebox in the boiler. The first step was preparation of the dies to be used in the more... |
|
Lead Truck Frame Painted
Saturday, February 23, 2013
There are always fill-in jobs around the shop to get parts ready for final assembly. We have spent quite a bit of time adjusting the lead truck, more... |
|
Lead Truck Frame Painted
Saturday, February 23, 2013
There are always fill-in jobs around the shop to get parts ready for final assembly. We have spent quite a bit of time adjusting the lead truck, more... |
|
Stu and Jim working on Cab Flanges
Saturday, January 26, 2013
Stu wields a torch and Jim a grinder as they remove and replace the studs that hold the flanges at the forward edge of the more... |
|
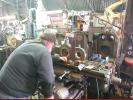
A Busy Shop
Saturday, January 26, 2013
The weekend following the spaghetti feed at the Elks saw a significant increase in the number of volunteers in the shop. And all who wanted to get more... |
|
Milling the head of the spring
Saturday, January 26, 2013
more... |
|
Springs and Staples
Saturday, January 12, 2013
Several of the main springs, the spring staples and the pins that holds the staple centered on the spring were worn enough that they had to be more... |
|
Springs and Staples
Saturday, January 12, 2013
Several of the main springs, the spring staples and the pins that holds the staple centered on the spring were worn enough that they had to be more... |
|
The Fuel Tank Goes In
Sunday, September 9, 2012
On September 9th we moved the renovated fuel tank from in front of the shop door and put it in its place on the tender. John borrowed one of the more... |
|
The Fuel Tank Goes In
Sunday, September 9, 2012
Once the fuel tank was in place on the track, Cary Coggins of the Port used the Pettibone crane to lift the tank so the tender could be rolled into more... |
|
The Fuel Tank Goes In
Sunday, September 9, 2012
Once the fuel tank was raised up the tender was pulled under it using a little fork more... |
|
The Fuel Tank Goes In
Sunday, September 9, 2012
Once the tender was in place under the fuel tank it took quite a bit of persuasion to get the tank down in its proper more... |
|
The Fuel Tank Goes In
Sunday, September 9, 2012
Once the tank was in place and down on its support timbers the lifting straps were disconnected and the tender was towed back to its spot on the more... |
|
Steam Tubes in the Fuel Tank
Saturday, July 21, 2012
One of the last tasks in the preparation of the fuel tank is the placement of new steam tubes on the floor. These tubes heat the fuel to ensure more... |
|
Steam Tubes in the Fuel Tank
Saturday, July 21, 2012
John welded high strength steel tubing to pipe nipples that we threaded into the 180 degree elbows using a special tool created for the job. As we more... |
|
Steam Tubes in the Fuel Tank
Saturday, July 21, 2012
The cleaned up steam coil is inside this baffle. It surrounds the tank outlet more... |
|
Steam Tubes in the Fuel Tank
Saturday, July 21, 2012
This is a photo taken of the steam coil when we took it out of the tank for more... |
|
Cleaning Locomotive Springs
Saturday, May 19, 2012
Recently we have been cleaning and painting parts that will bolt on the outside of the boiler. The springs will also be needed soon as we prepare to more... |
|
Boring for New Wrist Pins
Saturday, December 10, 2011
When we got the locomotive, the rods were removed and the wrist pins on the drivers coated with a layer of grease. Over the years the grease more... |
|
Boring for New Wrist Pins
Saturday, December 10, 2011
When we got the locomotive, the rods were removed and the wrist pins on the drivers coated with a layer of grease. Over the years the grease more... |
|
Backhead Plumbing
Sunday, October 2, 2011
As a bit of a diversion from the installation of staybolts, we have been working at the task if fitting parts and plumbing on the backhead. Parts more... |
|
The Cab is in Place
Sunday, September 25, 2011
We put the cab in place on the boiler prior to the September 10th Open House so that folks could get a better feel for the overall appearance of the more... |
|
Backhead Staybolts Complete
Sunday, August 14, 2011
One staybolt at a time, pretty soon all the holes are more... |
|
Then Tighten 'er Down
Saturday, August 13, 2011
And the cap gets tightened more... |
|
Copper Gasket Too
Saturday, August 13, 2011
Each staybolt cap gets a copper more... |
|
Putting Caps in the Sleeves
Saturday, August 13, 2011
We machined new caps for the more... |
|
New Sleeves for Flexible Staybolts
Saturday, April 9, 2011
Once the new sleeve is tacked in place it must be welded all around. John makes quick work of each more... |
|
New Sleeves for Flexible Staybolts
Saturday, April 9, 2011
New sleeves are required for the flexible staybolts on the portions of the boiler that were repaired. A special jig was made to enable the new more... |
|
Flexible Staybolts are Next
Saturday, March 19, 2011
All of the fixed staybolts are in and about half are peened over, both inside and out. Next must weld on the new sleeves for the flexible more... |
|
Backing up the staybolts while peening
Wednesday, February 9, 2011
When peening the staybolts a backer is needed behind the staybolt. We divised this little device that spans the firebox and enables one person to more... |
|
Staybolt Test Installation
Saturday, December 18, 2010
Before we inserted the fixed staybolts in the boiler, we set up a test fixture to practice peening over the ends of the more... |
|
Flexible Staybolt Sleeves Prepared
Saturday, December 11, 2010
Fixed staybolts have been threaded into the backhead and the outer staybolt positions have been reamed to prepare for welding in the sockets for the more... |
|
Caulking the Firebox Seam
Saturday, December 11, 2010
In riveted steel boiler construction, caulking is the process of rendering a seam watertight by driving a thick, blunt chisel-like tool into the more... |
|
Caulking the Firebox Seam
Saturday, December 11, 2010
In riveted steel boiler construction, caulking is the process of rendering a seam watertight by driving a thick, blunt chisel-like tool into the more... |
|
Tapping for Stay Bolts
Friday, November 19, 2010
Once we had completed the riveting of the mud ring we began to tap and install the stay bolts. An air motor is used to turn the stay bolt tap to more... |
|
Blind Rivets
Sunday, October 24, 2010
In the corners of the boiler there is not room enough for all of the rivets to go through the mud ring. Therefore a number of them are threaded into more... |
|
Blind Rivets
Sunday, October 24, 2010
In the corners of the boiler there is not room enough for all of the rivets to go through the mud ring. Therefore a number of them are threaded into more... |
|
Blind Rivets
Sunday, October 24, 2010
In the corners of the boiler there is not room enough for all of the rivets to go through the mud ring. Therefore a number of them are threaded into more... |
|
Surfacing the Stay Bolt Sleeves
Saturday, October 9, 2010
Using a special-built tool, we are able to surface the face of the flexible staybolt sleeves. This will enable a good seal. There will be a copper more... |
|
Surfacing the Stay Bolt Sleeves
Saturday, October 9, 2010
We built the tool specifically for this job. It screws onto the staybolt sleeves and the shaft is turned with a hand drill. The grindstone surfaces more... |
|
Surfacing the Stay Bolt Sleeves
Saturday, October 9, 2010
In order to create a right angle surface on the face of the sleeve the cutting stone must be trued more... |
|
Riveting the Mudring
Saturday, August 28, 2010
Once the Riveter was strengthened we proceeded to "fill" holes. This series of photos illustrates the riveting more... |
|
Riveting the Mudring
Saturday, August 28, 2010
Once the Riveter was strengthened we proceeded to "fill" holes. This series of photos illustrates the riveting more... |
|
Riveting the Mudring
Saturday, August 28, 2010
Once the Riveter was strengthened we proceeded to "fill" holes. This series of photos illustrates the riveting more... |
|
Riveting the Mudring
Saturday, August 28, 2010
Once the Riveter was strengthened we proceeded to "fill" holes. This series of photos illustrates the riveting more... |
|
Riveting the Mudring
Saturday, August 28, 2010
Once the Riveter was strengthened we proceeded to "fill" holes. This series of photos illustrates the riveting more... |
|
Riveting the Mudring
Saturday, August 28, 2010
Once the Riveter was strengthened we proceeded to "fill" holes. This series of photos illustrates the riveting more... |
|
Riveting the Mudring
Saturday, August 28, 2010
Once the Riveter was strengthened we proceeded to "fill" holes. This series of photos illustrates the riveting process. Here we see the more... |
|
The Riveter wasn't big enough
Saturday, August 7, 2010
Shortly after completing the Hydraulic Riveter we put it to the test forming rivets in the mudring. After just a couple of rivets the clamp began to more... |
|
The Hydraulic Riveter
Saturday, April 3, 2010
Since we got the firebox into the boiler, we have also spent a lot of time building a hydraulic riveter - a big clamp to squeeze the rivets in place more... |
|
Preparing to rivet the mudring
Saturday, March 27, 2010
This is a series of photos showing the preparation necessary prior to riveting the mudring in place. The rivets need to be flush on the inside in more... |
|
Preparing to rivet the mudring
Saturday, March 27, 2010
This is a series of photos showing the preparation necessary prior to riveting the mudring in place. The rivets need to be flush on the inside in more... |
|
Preparing to rivet the mudring
Saturday, March 27, 2010
This is a series of photos showing the preparation necessary prior to riveting the mudring in place. The rivets need to be flush on the inside in more... |
|
Preparing to rivet the mudring
Saturday, March 27, 2010
This is a series of photos showing the preparation necessary prior to riveting the mudring in place. The rivets need to be flush on the inside in more... |
|
Firebox is inside the Boiler
Saturday, January 16, 2010
The weekend of January 9-10, 2010 marked another major step in the restoration of SMV 21. The entire boiler was raised up on cribbing so that the more... |
|
The Firebox goes in (photo sequence)
Saturday, January 9, 2010
In order to get the firebox into place we raised the entire boiler on cribbing. We lifted the smokebox and each back corner a few inches at a time more... |
|
The Firebox goes in (photo sequence)
Saturday, January 9, 2010
In order to get the firebox into place we raised the entire boiler on cribbing. We lifted the smokebox and each back corner a few inches at a time more... |
|
The Firebox goes in (photo sequence)
Saturday, January 9, 2010
In order to get the firebox into place we raised the entire boiler on cribbing. We lifted the smokebox and each back corner a few inches at a time more... |
|
The Firebox goes in (photo sequence)
Saturday, January 9, 2010
The firebox was ready and waiting with the mudring pinned in place on it. Next step was to lower it down onto four pieces of pipe so it can be more... |
|
The Firebox goes in (photo sequence)
Saturday, January 9, 2010
We eased the firebox up to the boiler while still hanging on the crane, then down on the rollers it more... |
|
The Firebox goes in (photo sequence)
Saturday, January 9, 2010
And then we rolled it in. It really did fit - without significant more... |
|
The Firebox goes in (photo sequence)
Saturday, January 9, 2010
more... |
|
The Firebox goes in (photo sequence)
Saturday, January 9, 2010
more... |
|
The Firebox goes in (photo sequence)
Saturday, January 9, 2010
Once the boiler was back down to a managable height we attached lifting rings to the firebox so that we could lift it up the last couple of more... |
|
The Firebox goes in (photo sequence)
Saturday, January 9, 2010
Once the boiler was back down to a managable height we attached lifting rings to the firebox so that we could lift it up the last couple of more... |
|
The Firebox goes in (photo sequence)
Saturday, January 9, 2010
As we raised the firebox we had to ease the mudring into the boiler - a very tight fit. We were able to get it started in on most of the way around more... |
|
New equilizer beam machined
Friday, December 18, 2009
One of the four equilizer bars for #21 was missing so we have been machining a new one. This has been a fill-in project on the large horizontal more... |
|
Working on the new equilizer beam
Friday, December 18, 2009
One of the four equilizer bars for #21 was missing so we have been machining a new one. This has been a fill-in project on the large horizontal more... |
|
FRA inspector visits the shop
Monday, December 7, 2009
On December 7th we were visited by Gary Groff and his assistant Howard Gehrke. Mr. Groff is the Steam Locomotive Inspector for the Federal Railroad more... |
|
Rebuilding the Lead Truck
Saturday, September 5, 2009
Rebuilding #21's lead truck has been one of our recent projects. It had been extensively modified and in a pretty haphazard way. The upright more... |
|
Rebuilding the Lead Truck
Saturday, September 5, 2009
Here we have temporarily placed the "Rolling Swing Arms" and the square stock "rails" on the front of the lead truck for more... |
|
Rebuilding the Lead Truck
Saturday, September 5, 2009
Here is a close-up of #21's blueprint showing the front truck as originally planned. The two 9" long heart shaped arms hanging down are the more... |
|
Rebuilding the Lead Truck
Saturday, September 5, 2009
This closeup photo shows the fireman's side of the lead truck with the journal box (black casting) sitting on the brass which contains babbit more... |
|
Rebuilding the Lead Truck
Saturday, September 5, 2009
more... |
|
Oil Tank Painted
Wednesday, July 15, 2009
Here is the oil tank inside Lektro's state of the art paint booth with a shiny new coat of black Imron paint. It has since been moved back to more... |
|
Newly painted water tank leaves Lektro
Wednesday, September 3, 2008
more... |
|
Water tank comes out of the paint booth
Monday, August 25, 2008
more... |
|
Kelly is done painting,
Sunday, August 24, 2008
more... |
|
The black Imron goes on nicely
Sunday, August 24, 2008
more... |
|
Primer coat wasn't smooth enough
Saturday, August 23, 2008
more... |
|
Actually it was badly orangepeeled!
Saturday, August 23, 2008
And if the orangepeel wasn't enough, the paint wasn't completely cured despite the heat that was applied in the spray booth. So we more... |
|
Restored Tender Frame goes on its Trucks
Tuesday, August 19, 2008
A red letter day for the tender restoration. Dan Hess hauled the restored and freshly painted tender frame from the POA boatyard to the tracks more... |
|
Tender frame at Red Lion
Tuesday, August 19, 2008
A red letter day for the tender restoration. The restored and freshly painted tender frame was lifted onto its trucks - back on the rails. more... |
|
Tender frame up and over
Tuesday, August 19, 2008
A red letter day for the tender restoration. The restored and freshly painted tender frame was lifted onto its trucks - back on the rails. more... |
|
Tender frame eased onto trucks
Tuesday, August 19, 2008
A red letter day for the tender restoration. The restored and freshly painted tender frame was lifted onto its trucks - back on the rails. more... |
|
Water tank goes off for a new paint job.
Tuesday, August 19, 2008
more... |
|
Water tank goes off for a new paint job.
Tuesday, August 19, 2008
more... |
|
Casey is oh-so-tired.
Tuesday, August 19, 2008
The restored and freshly painted tender frame is back on the rails and near the restoration shop where it will receive a new timber deck. After the more... |
|
Water tank almost ready for paint
Sunday, August 10, 2008
more... |
|
Paint touch up for tender truck
Sunday, August 10, 2008
Both tender trucks have now been assembled and we are getting ready to move them to the track where they will meet up again with the frame. While we more... |
|
Half round added to combing edge
Sunday, July 27, 2008
All of the tank structure is complete so it is time for the decorative touches. This half round is shaped to fit the combing edge and will be riveted more... |
|
The combing half-round has been riveted
Sunday, July 27, 2008
more... |
|
Finished combing half-round
Sunday, July 27, 2008
more... |
|
Forge Anyone?
Saturday, July 26, 2008
This little gem got a lot of use as each and every one of the hundreds of rivets in the tender was heated within its brick lined walls. more... |
|
Oil Tank Repairs
Tuesday, July 22, 2008
more... |
|
Oil Tank Repairs
Tuesday, July 22, 2008
more... |
|
Oil Tank Repairs
Sunday, July 6, 2008
A number of rivets in the oil tank were badly corroded and needed to be replaced. Here Casey is grinding off the heads of those rivets before more... |
|
Oil Tank Repairs
Sunday, July 6, 2008
more... |
|
Ready and Waiting
Sunday, June 22, 2008
These are the wheels for the leading and trailing trucks. They have been cleaned and painted and they await space and time in the shop where the more... |
|
Staybolt Anyone?
Sunday, June 22, 2008
more... |
|
Tender trucks assembled
Saturday, June 7, 2008
more... |
|
New Water Tank Ready for Sandblast
Saturday, May 31, 2008
more... |
|
Tender brake cylinder reworked
Saturday, May 24, 2008
more... |
|
Tender tool box gets a new paint job
Saturday, May 24, 2008
more... |
|
Tender truck assembly
Tuesday, January 15, 2008
more... |
|
Old Water Tank Rusted Through
Tuesday, May 31, 2005
Here is a good shot of the engineers side of the SMV #21's tender water tank showing some of the holes that have rusted through. It is pretty more... |
|
Tender Sits in Storage
Monday, May 30, 2005
While we worked at restoring #21, her tender waited patiently for her turn in the shop. Finally in 2005 we obtained an Oregon Heritage Foundation more... |
|
Crown Sheet Removal
Wednesday, December 4, 2002
Here is an rare view of the top of the firebox crown sheet from inside the boiler, looking to the rear. We are in the process of flame cutting the more... |
|
Machining the Throttle Body
Thursday, August 29, 2002
Here the throttle body is "chucked up" in a vertical turret lathe to cut new seats. This is the position the throttle mounts in the dome more... |
|
Machining the Throttle Spool
Thursday, August 29, 2002
The throttle spool is in our tracer lathe, having just had the two seats cut. They are the shiny bands near the right and left ends. Both seats were more... |
|
Tapping Washout Plug Holes
Thursday, August 22, 2002
There are four washout holes, located just above the mudring in the new section of the backhead (There are 15 or so of these holes throughout the more... |
|
Dry Pipe Cut
Thursday, August 8, 2002
#21 is fitted with a Ruston Balanced Throttle which is located in the steam dome. This is the large dome in the middle which is easily seen in all more... |
|
Firebox Door Sheet Flanged
Tuesday, July 16, 2002
The entire flanging process can be seen in this photo. Notice how the new sheet is clamped to the old sheet/die near to the edges to be formed. more... |
|
Firebox Door Sheet Ready to Flange
Saturday, July 13, 2002
The firebox door sheet gets its final preparations before flanging. Seams between the extensions were welded up by John and Stuart. more... |
|
Outer Wrapper Patches Welded
Friday, July 5, 2002
The sides of the boiler wrapper down low and under the cab wasted away from outside. A new patch panel was cut bent and drilled. And is now being more... |
|
Firebox Door Sheet Die Corners Added
Saturday, June 29, 2002
The old riveted firebox has seams where the sheets overlapped over each other. The door sheet was against the mudring extending about one inch past more... |
|
Firebox Door Sheet Formed
Tuesday, June 11, 2002
John Niemann heats the doorway hole in the firebox door sheet before bringing the 600 ton press down to complete the forming of the more... |
|
Come Ring the Bell
Sunday, May 19, 2002
#21 bell was stolen in the early 1980’s while the locomotive was stored in Northern California. While ARPA is still looking for #21 original bell, more... |
|
Mudring Rivet Removal
Tuesday, April 30, 2002
Having removed the firebox flue sheet, we now have to remove the mudring. This means driving out a couple of hundred 7/8” diameter rivets about 6 more... |
|
Mudring Rivets Get Drilled
Monday, April 29, 2002
Casey Cochran tries out ARPA’s recently acquired magnetic base drill, which was purchased with funds from recent fund raisers. The mag drill weighs more... |
|
Students from AHS help
Saturday, March 9, 2002
A group of students from Astoria High School's "Club de Union Juvenil" helped to clean out the inside of SPS 273 shortly after it more... |
|
Backhead Doorway Flanged
Thursday, March 7, 2002
We have started to form the new manhole doorway in the new backhead. The female die was bolted to the bottom of the new backhead plate. The die was more... |
|
Flanging the Backhead
Tuesday, June 5, 2001
Work on the back of the boiler is progressing carefully and steadily. We have built a die to flange the compound radius bends in the backhead more... |